Superquick Firebase Authentication tutorial
There is a lot of buzz about cloud computing platforms these days. Google as a major player can not be an exception with his Firebase. It is quite impressive what you can actually do with it. Starting with the realtime database, which had been the starting point for Firebase before Google purchased it back in 2014. It also comes with push notifications, analytics, support for custom functions similar to Amazon AWS lambdas, and more. All under one hood and available for Android, iOs and web through JavaScript library. Nevertheless, point of this tutorial is to be super simple and introduce you to Firebase Authentication on Android, as it is my development area.
Introduction
Coding of the proper authentication was quite time consuming up until now. Either you had to implement it yourself for each service/social network your project had to support (Google, Facebook etc.) multiplying it by each platform your project was running on (Android, iOS etc.). Or you had to use some in-house or 3rd party solution which could be pricey, making it an issue if you wanted to reuse it in another project. Hopefully these days are over and bright future has already arrived 🙂 Firebase comes with its Firebase Authentication that works with most of the popular identity providers out there such as Google, Facebook, Twitter and more. It also conveniently provides you with UI that comes with Google's UX best practices in FirebaseUI libraries set. This is also the way you are about to see it in action in this tutorial.
Real stuff
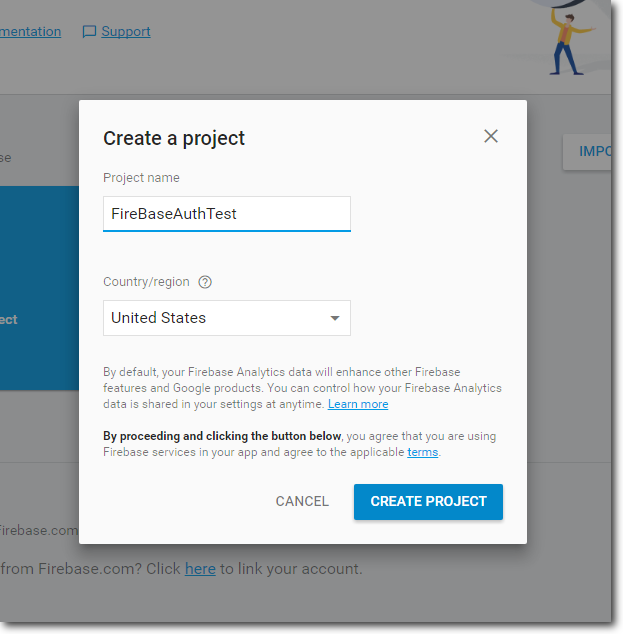
Before you start, you might check the Firebase prerequisites HERE. You do not have to expect anything surprising, even though Google Play services dependency might be an issue in rare cases (e.g. if China's audience is your goal as Google Play services are banned there). Now log into Firebase console with your Google account: https://console.firebase.google.com Firebase console gives you access to all of your Firebase projects, services and configuration options. All in one place. Click on "Add/Create project" and pick up the name you like.
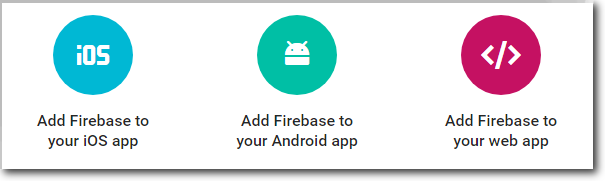
As soon as you create new project you will land on your project's home page. Now it is time to bind your Android application to just created Firebase project. Click on the "Add Firebase to your Android app" button.
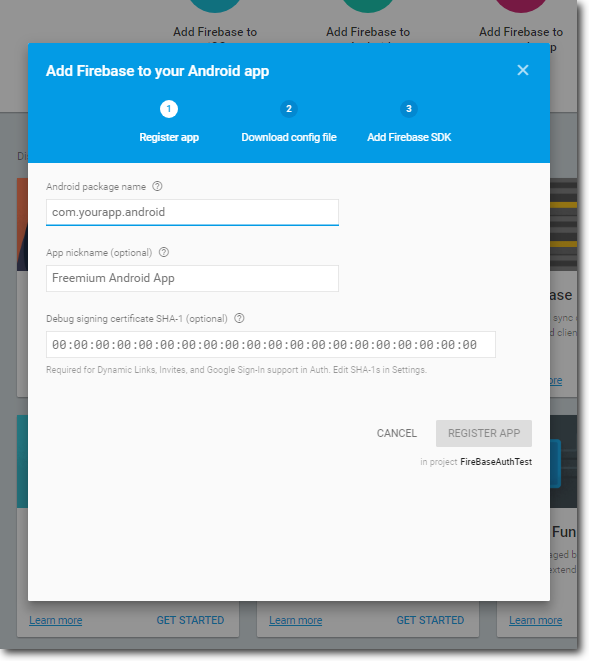
Enter package name, optional nick name and debug SHA-1 key. You are going to use Google Sign-in in this example, thus entering the debug key would be necessary.
You can get your debug key by calling following command from command line. Windows:
keytool -exportcert -list -v -alias androiddebugkey -keystore %USERPROFILE%\.android\debug.keystore -storepass android -keypass android
Linux:
keytool -list -v -keystore ~/.android/debug.keystore -alias androiddebugkey -storepass android -keypass android
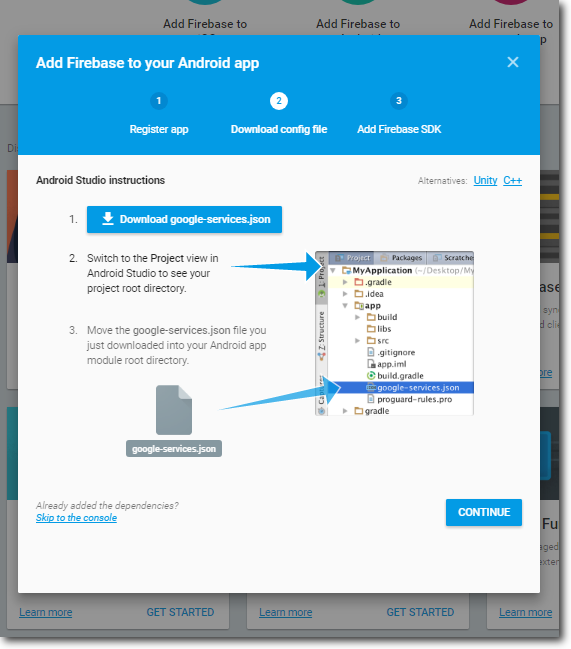
Click on "Register App". Firebase now generates config file for your application. Download it by clicking on "Download google-services.json" and place it to YOUR_PROJECT\app directory.
Click on "Continue" and follow the steps to update your gradle files. Now add the Fabric repository to your project's build.gradle file, otherwise project won't build:
repositories {
   // ...
   maven { url 'https://maven.fabric.io/public' }
}
As mentioned previously, it is good idea to take advantage of Google's authentication UI, so you do not have to spend your precious time by reinventing the wheel. Set of libraries called FireBaseUI will take care of the whole authentication flow, it even supports user registration. Add following lines to our app's build.gradle to take advantage of FirebaseUI:
dependencies {
   // ...
   compile 'com.firebaseui:firebase-ui-auth:1.2.0'
}
FirebaseUI library is transiently dependent on FirebaseAuth and Google Play service libraries, thus we do not have to add them to our build.gradle dependency list ourselves. Here comes the resulting project's (root level) build.gradle file: buildscript {
    repositories {
        jcenter()
    }
    dependencies {
        classpath 'com.android.tools.build:gradle:2.3.1'
        classpath 'com.google.gms:google-services:3.0.0'
    }
}

allprojects {
    repositories {
        jcenter()
        maven { url 'https://maven.fabric.io/public' }
    }
}

task clean(type: Delete) {
    delete rootProject.buildDir
}
In app level build.gradle we also add dependency for Google's Volley. We will use it for displaying the image of signed-in user from URL. Resulting app level build.gradle is shown below: apply plugin: 'com.android.application'
apply plugin: 'com.google.gms.google-services'

android {
    compileSdkVersion 25
    buildToolsVersion "25.0.0"
    defaultConfig {
        applicationId "com.hotovo.firebaseauth"
        minSdkVersion 23
        targetSdkVersion 25
        versionCode 1
        versionName "1.0"
        testInstrumentationRunner "android.support.test.runner.AndroidJUnitRunner"
    }
    buildTypes {
        release {
            minifyEnabled false
            proguardFiles getDefaultProguardFile('proguard-android.txt'), 'proguard-rules.pro'
        }
    }
}

dependencies {
    compile fileTree(dir: 'libs', include🙂
    androidTestCompile('com.android.support.test.espresso:espresso-core:2.2.2', {
        exclude group: 'com.android.support', module: 'support-annotations'
    })
    compile 'com.android.support:appcompat-v7:25.1.1'
    compile 'com.android.support.constraint:constraint-layout:1.0.0-alpha8'
    compile 'com.firebaseui:firebase-ui:1.2.0'
    compile 'com.android.volley:volley:1.0.0'
    testCompile 'junit:junit:4.12'
}
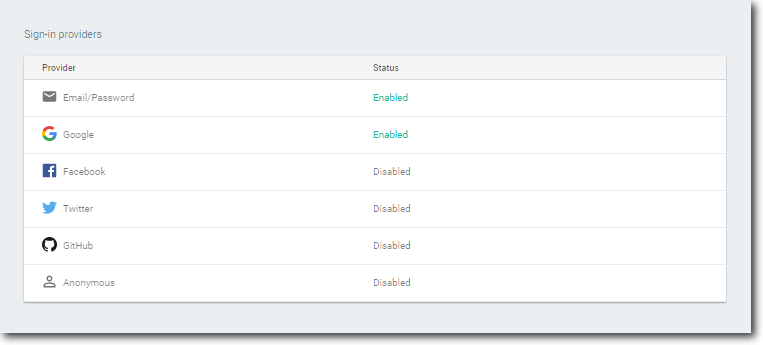
Get back to the console and click on "GET STARTED" on Authentication tile. On Authentication page click on "SET UP SIGN-IN METHOD". You can see the list of available providers. In this example we will enable Email/Password and Google sign-in methods.
Now it is time to get dirty, I promised this to be super simple. So here comes the activity's layout file (activity_main.xml)
<?xml version="1.0" encoding="utf-8"?>
<LinearLayout
    xmlns:android="http://schemas.android.com/apk/res/android"
    xmlns:tools="http://schemas.android.com/tools"
    android:layout_width="match_parent"
    android:layout_height="match_parent"
    tools:context="com.hotovo.firebaseauth.MainActivity"
    android:orientation="vertical">

    <Button
        android:id="@+id/button"
        android:layout_width="wrap_content"
        android:layout_height="wrap_content"
        android:text="Login"
        style="@style/TitleView"
        tools:text="@string/login"/>

    <com.android.volley.toolbox.NetworkImageView
        android:id="@+id/image"
        android:layout_width="wrap_content"
        android:layout_height="wrap_content"
        style="@style/TitleView"/>

    <TextView
        android:id="@+id/text"
        android:layout_width="wrap_content"
        android:layout_height="wrap_content"
        android:layout_weight="1"
        style="@style/TitleView"/>

</LinearLayout>
And the activity itself (MainActivity.java)
package com.hotovo.firebaseauth;

import android.content.Intent;
import android.graphics.Bitmap;
import android.support.annotation.NonNull;
import android.support.v4.util.LruCache;
import android.support.v7.app.AppCompatActivity;
import android.os.Bundle;
import android.view.View;
import android.widget.Button;
import android.widget.TextView;
import android.widget.Toast;

import com.android.volley.toolbox.ImageLoader;
import com.android.volley.toolbox.NetworkImageView;
import com.android.volley.toolbox.Volley;
import com.firebase.ui.auth.AuthUI;
import com.firebase.ui.auth.ErrorCodes;
import com.firebase.ui.auth.IdpResponse;
import com.firebase.ui.auth.ResultCodes;
import com.google.android.gms.tasks.OnCompleteListener;
import com.google.android.gms.tasks.Task;
import com.google.firebase.auth.FirebaseAuth;
import com.google.firebase.auth.FirebaseUser;

import java.util.Arrays;

public class MainActivity extends AppCompatActivity {
    private Button button;
    private TextView text;
    private NetworkImageView image;
    private FirebaseAuth auth;
    private ImageLoader imageLoader;
    private static final int RC_SIGN_IN = 123;

    @Override
    protected void onCreate(Bundle savedInstanceState) {
        super.onCreate(savedInstanceState);
        setContentView(R.layout.activity_main);

        auth = FirebaseAuth.getInstance();

        // Common imageloader init for volley
        imageLoader = new ImageLoader(Volley.newRequestQueue(this), new ImageLoader.ImageCache() {
            private final LruCache<String, Bitmap> mCache = new LruCache<>(10);

            public void putBitmap(String url, Bitmap bitmap) {
                mCache.put(url, bitmap);
            }

            public Bitmap getBitmap(String url) {
                return mCache.get(url);
            }
        });

        // Obtain the views
        button = (Button) findViewById(R.id.button);
        text = (TextView) findViewById(R.id.text);
        image = (NetworkImageView) findViewById(R.id.image);

        button.setOnClickListener(new View.OnClickListener() {
            @Override
            public void onClick(View view) {
                if (!isLoggedIn()) {
                    // Fire the sign in with FireBase
                    startActivityForResult(AuthUI.getInstance().
                                    createSignInIntentBuilder().
                                    setProviders(Arrays.asList(new AuthUI.IdpConfig.Builder(AuthUI.EMAIL_PROVIDER).build(),
                                            new AuthUI.IdpConfig.Builder(AuthUI.GOOGLE_PROVIDER).build())).build(),
                            RC_SIGN_IN);
                } else {
                    // Perform sign out
                    AuthUI.getInstance()
                            .signOut(MainActivity.this)
                            .addOnCompleteListener(new OnCompleteListener<Void>() {
                                public void onComplete(@NonNull Task<Void> task) {
                                    // User is now signed out
                                    showMessage(R.string.signed_out);
                                    updateViews();
                                }
                            });
                }
            }
        });

        updateViews();
    }

    @Override
    protected void onActivityResult(int requestCode, int resultCode, Intent data) {
        super.onActivityResult(requestCode, resultCode, data);
        if (requestCode == RC_SIGN_IN) {
            // Get identity provider response from intent
            IdpResponse response = IdpResponse.fromResultIntent(data);

            if (resultCode == ResultCodes.OK) {
                // Successfully signed in
                updateViews();
                return;
            } else {
                // Sign in failed
                updateViews();
                if (response == null) {
                    // User pressed back button
                    showMessage(R.string.sign_in_cancelled);
                    return;
                }

                if (response.getErrorCode() == ErrorCodes.NO_NETWORK) {
                    showMessage(R.string.no_internet_connection);
                    return;
                }

                if (response.getErrorCode() == ErrorCodes.UNKNOWN_ERROR) {
                    showMessage(R.string.unknown_error);
                    return;
                }
            }

            showMessage(R.string.unknown_response);
        }
    }

    private void updateViews() {
        if (isLoggedIn()) {
            showMessage(R.string.signed_in);
            button.setText(R.string.sign_out);
            FirebaseUser user = auth.getCurrentUser();
            // Show user info
            text.setText("UID: " + user.getUid() + "\n" +
                    "Name: " + user.getDisplayName() + "\n" +
                    "Email: " + user.getEmail());
            image.setImageUrl(user.getPhotoUrl().toString(), imageLoader);
            image.setVisibility(View.VISIBLE);
        } else {
            button.setText(R.string.sign_in);
            text.setText("");
            image.setVisibility(View.GONE);
        }
    }

    private boolean isLoggedIn() {
        return auth.getCurrentUser() != null;
    }

    private void showMessage(int message) {
        Toast.makeText(this, message, Toast.LENGTH_LONG).show();
    }
}
In the onCreate() method of MainActivity.java you get the instance of your FirebaseAuth provider. Next you set up the views and update them by calling updateViews(), as you might be still logged in from previous session. In updateViews() we either show user's information or hide user related information and toggle login button text (Sign in/Sign Out). You can check whether user is signed simply by doing this: auth.getCurrentUser() != null. You can see this in the isLoggedIn() method.
Firebase Authentication flow is simply launched by the creating an intent with the AuthUI. Intent is launched this way:
startActivityForResult(AuthUI.getInstance().
   createSignInIntentBuilder().
   setProviders(Arrays.asList(new
   AuthUI.IdpConfig.Builder(AuthUI.EMAIL_PROVIDER).build(),
   new AuthUI.IdpConfig.Builder(AuthUI.GOOGLE_PROVIDER).build())).build(),
   RC_SIGN_IN);
You can see the list of the providers that matches the providers we enabled in the Firebase console. Last RC_SIGN_IN parameter is the request code which identifies our request. It is passed back as parameter in onActivityResult(...) callback after the sign-in flow ends. You can see the handling of response in onActivityResult(...) code. It is pretty self-explanatory. If the resultCode == ResultCodes.OK, the user was successfuly signed. Otherwise there was some problem or user cancelled sign-in himself. If the user is signed in successfuly, we extract provided information in updateViews() method. That's pretty much it. Once you obtain an UID in your real application, you can launch your own sign-up procedure where you can ask user to enter his his full name, phone number etc. Then you can simply save this information with Firebase NoSQL database which is realtime, crossplatform and really simple to setup and use.
Some links
For more information about FireBaseUI, such as theming, etc check its GitHub homepage HERE. You can download the tutorial source code and APK: HotovoFireBaseAuthTutorial.zip. You have to provide your own google-services.json file and update project's package name to build it. Have fun!
about the author
Pavol Madeja

I am the team leader of the mobile stream at Hotovo and a real mobile enthusiast. Starting out by coding programmable calculators in my childhood, I am no stranger to the idea of developing mobile devices! I’ve previously worked for companies like Samsung and Nokia, and am now strengthening our mobile development team with my expertise.